In this project, I use equipped PiCam Raspberry Pi for wireless cameras, remote, about hundred meters inside send image. Images transmitted by slow-scan television (SSTV) through the amateur radio station (commonly known as ham radio) in 2 meter band (144.5 MHz) transmission.
Thank you Oliver Mattos and Oskar Weigl,Raspberry Pi can send high-frequency FM signal, low power transmission without the use of additional electronic products. If the power slightly increased more than a single transistor or two-transistor amplifier. In addition, recommended the use of a low pass filter to filter high-frequency signals.
This project also contains the Python code to detect dynamic objects, make Raspberry Pi as far more than ordinary WiFi Internet wireless surveillance cameras. Please note! you have to have an amateur radio license in order to use this device.
Following is a device icon, please follow the steps. Item code can be found in my blog or my GitHub page.
Special thanks to KI4MCW (SSTV), Oliver Mattos and Oskar Weigl (PiFm)

Illustration:/Pi/PiFace NoIR Camera PiNoIR camera antenna antenna control and display PiFace display control panel/Battery battery
Portable SSTV photography opportunities to shoot images and youyeyu transmitted radio SSTV camera images.
Materials
Raspberry Pi single board computer Maker Shed website item number #MKPRI2,makershed.com. I select Raspbian operating system, because it is the most popular Raspberry Pi also has good support for your operating system.
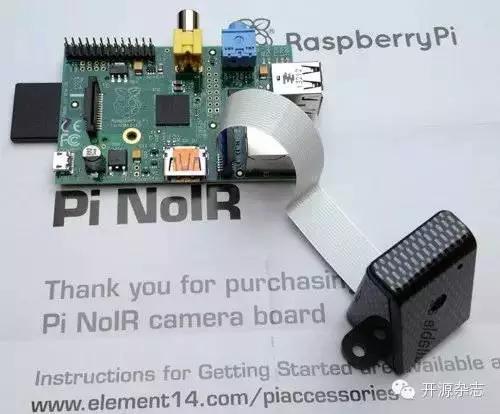
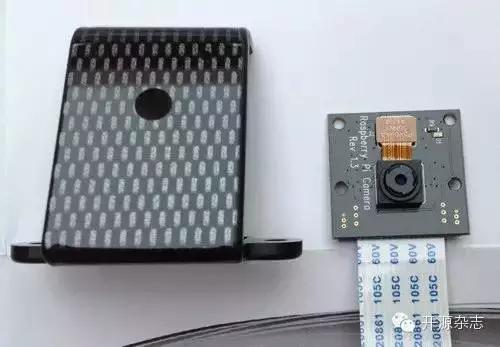
Pi NoIR camera module, Maker Shed website item number #MKRPI6. PiCam or USB webcam also.
PiFace display control panel (optional) but recommended to buy. I'm going to Pi as Raspberry photography slow scan TV camera to use, therefore have a display panel with a button which is very convenient.
Battery, US 5 volt mobile power.
A small piece of wire, antenna will be used.
Band support antenna.
Kraft paper, any items of essential goods.
Step one: connect the hardware
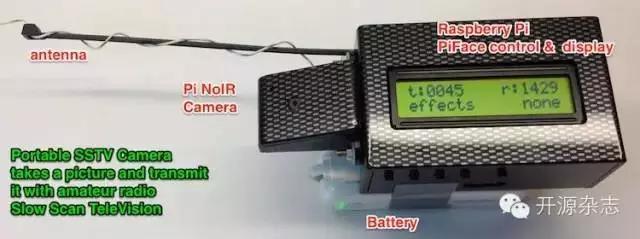
In this project, will use the hardware only has Raspberry Pi, Pi NoIR camera and PiFace control display panel and is used as antenna a wire.
In order to achieve portability, Kraft tape stuck to Raspberry Pi a 5V USB battery pack housing.
The second step: footage
First thing to do is take pictures you want to transfer, use raspistill command line makes it easy to reach:
raspistill -t 1 --width 320 --height 256 -e png -o /tmp/image.png
SSTV, we need 320x256 small pixel image. It will save in PNG image file format to the/tmp directory.
The third step: Converts the image to sound SSTV
Next, we want to convert images for the wireless transmission of sound files. Some SSTV Raspberry Pi instruction can be selected.
First to test is PiSSTV, which is a Python command. It can be used, but the speed is very slow, an image takes several minutes to conversion is complete. (Refer to the details on my blog. )
Then I found by ham KI4MCW Robert Marshall (Robert Marshall) by writing simple c language instruction. Unfortunately, some errors in the leading tone, but are very easy to fix. I have it to make them more flexible, you can set sound sampling frequency at the command line.
My instruction code can be found at GitHub. Compile the source code:
pi@rpicamera ~/sstv $ sudo apt-get install libgd2-xpm-dev pi@rpicamera ~/sstv $ sudo apt-get install libmagic-dev pi@rpicamera ~/sstv $ gcc -lgd -lmagic -o pisstv pisstv.c
Implementation procedures:
pi@rpicamera ~/pisstv $ ./pisstv /tmp/image.png 22050 Constants check: rate = 22050 BITS = 16 VOLPCT = 20 scale = 6553 us/samp = 45.351474 2p/rate = 0.000285 Checking filetype for file [/tmp/ image.png] File is a PNG image. Input file is [/tmp/image.png]. Output file is [/tmp/image.png.wav]. Writing audio data to file. Got a total of [2589556] samples. Done writing to audio file. Created soundfile in 4 seconds.
We can see the SSTV sound files created in only 4 seconds. Everything has gone smoothly. Next: Wireless sound transmission.
Fourth step: to PiFM the transmission sound Thank Tesla charge can be elegant
You can install a wireless transmitter, as a portable wireless transceiver, but Raspberry Pi himself to generate high frequency signals are much more interesting. Thanks Oliver Mattos and Oskar Weigl this PiFM software (you can refer to our Raspberry Pi).
Their program code can be found here. It has been a great deal of progress: the original version is very simple, but use all the CPU cycles, and signal interference by other spurious signals resulting from the operation of a program. The latest version using DMA, operate very smoothly, do not consume all of the CPU cycles. But the code is now much more complicated.
Oliver and Oskar has a great contribution, but PiFm software used in ham radio, SSTV is not suitable. There are two main problems. First is the bandwidth is too large, and the second is a timing issue. Timing is important for SSTV, and some errors.
Fifth step: reduce bandwidth
Reducing the bandwidth is very simple. Every ham know, bandwidth can be set by the modulation of frequency modulation coefficient, and voice modulated high frequency carrier signal volume is equal. In the original code, it is a single value; you can consume in Outputter/class function to find.
This is the original code:
void consume(float* data, int num) { for (int i=0; i
I did the value of the command line parameters. New code is this:
void consume(float* data, int num) { for (int i=0; i
But this effect is not good, still have a very strong side, so I also need to pay more attention in future versions of the software.
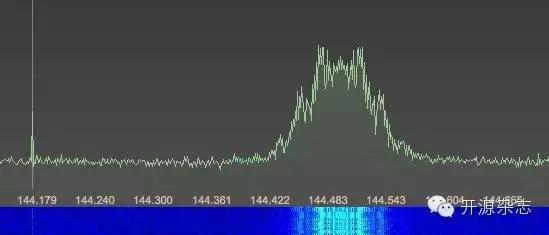
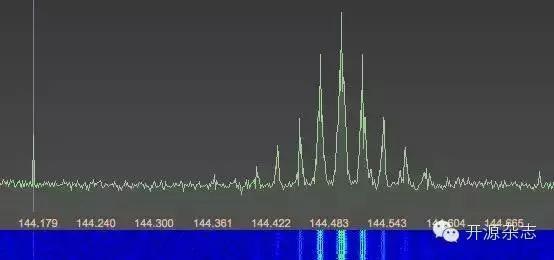
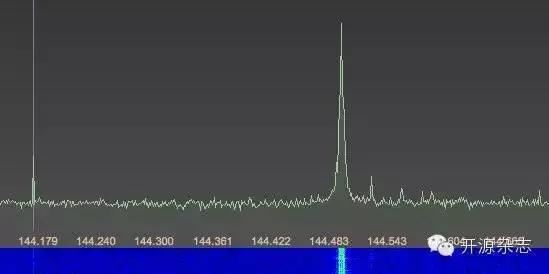
The first picture is the bandwidth of FM signal spectrum.
Second spectrogram display to reduce bandwidth. Adjustment after the peak in the middle to get dry cleans the signal, but still need to clear the edges.
Last picture is PiFm original version of reduced bandwidth signals, bandwidth is great, but the signal of interference generated by the CPU to perform other procedures.
The sixth step: adjusting timing

PiFm sound when transferring a sample rate slightly increased or decreased, the listener hardly feel the difference, but for SSTV arrived, SSTV clock needs to be accurate.
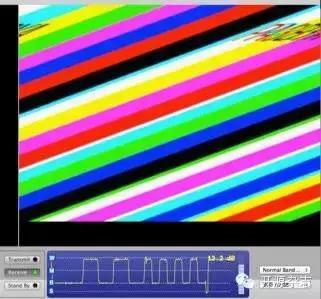
Sampling rate causes image errors slightly tilt, as see in the first picture.
The second picture is adoption right for the same sound file.
Fix timing is very simple, as long as the time base to modify the original code.
clocksPerSample = 22500.0 / rate * 1373.5; for timing, determined by experiment clocksPerSample = 22050.0 / rate * timing_correction; for timing, determined by experiment
Here you can see I use the variable timing_correction to replace the time base (1373.5), can be set by command line. Individual Raspberry Pi will have different values. In my case, the value is 1414.0. I want to know how much is appropriate for your set, please comment below and tell me. Other code changes, please refer to the GitHub source eucalyptus.
Seventh step: new call sign
Start using your ham radio authorization transmit SSTV signal, you need to transfer each time you transfer your call sign, so we will have this information added to image.
Imagick we can from the command line or from the Python Imaging Library (PIL) to complete. This project used both.
Eighth step: capturing dynamic
We can now capture images and smooth transfer with PiFm, then the task is triggered when there was movement in front of the camera image capture. I put this command in Python, and PIL. This code is very simple, it compares the previous image and the current image's pixel. If the changes are too large, it will transmit images.
Here is the code fragment:
# loop forever while (True): # grab comparison image imgnew, bufnew = captureImage() # Count changed pixel changedPixels = 0 for x in xrange(0, 320): for y in xrange(0, 256): # Just check red channel as it's dominant for PiCam NoIR pixdiff = abs(buf[x,y][0] - bufnew[x,y][0]) if pixdiff > threshold: changedPixels += 1 # Transmit an image if pixels changed if changedPixels > sensitivity: # Swap comparison buffers img = imgnew buf = bufnew transmitImage(img.copy())
------------------------
Note: this article was reprinted from other media, and aims to deliver more information does not mean that AVIC I love guest shares his views and is responsible for its authenticity.
No comments:
Post a Comment